X Post to target
The X post to target campaign acts just like an email to target campaign, except it allows your supporters to post messages to targets that have X handles. These can be your own custom targets, or you can use one of our postcode databases. For example, you could ask your supporters to post to their MP, or to post at a company if you supply that handle.
Not all target databases have X handles – so only some will be available if you use a database for your campaign. Check this page for more details.
This guide will take you through the steps to create a new X post to target campaign.
X Post to target pages do not record data if the target block is on the first page
Summary of the steps
Here is a summary of the steps we’ll be going through, which you can also use as a reminder if you have created one before. Click Next at the bottom of this page to get a detailed explanation of each step.
Create your X post to target page. Create from scratch or duplicate an existing page
Select your targets. Custom targets, Postal Code database, or Custom database
Update your page settings. Determine what template to use
Add the content of your page. Add text, form fields, buttons and a X post to target block.
Test and launch your campaign!
Create your X post to target page
To create a new campaign, you can either duplicate an existing campaign or create a new one from scratch.
To create a brand new page, click “New Page”. You will be shown a variety of different pages you can make:
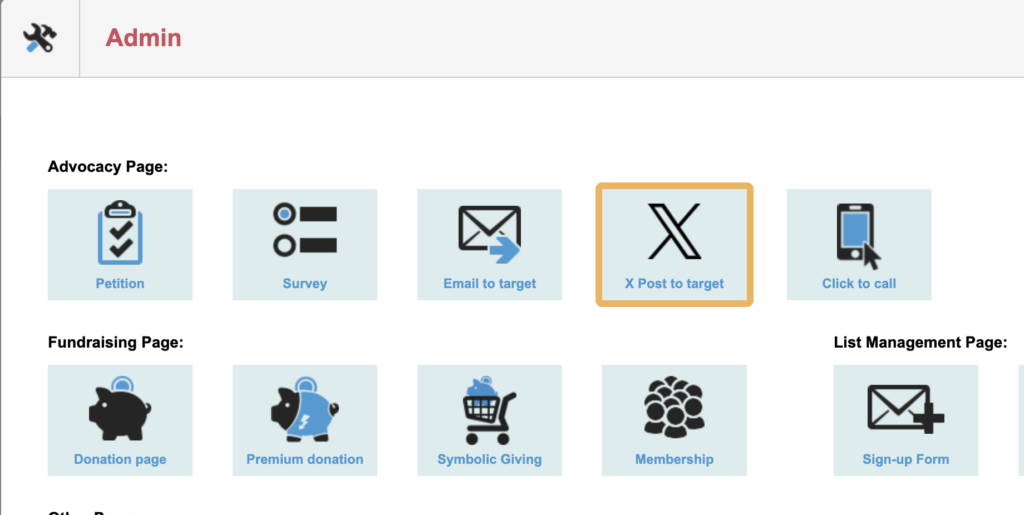
Click on “X Post to target” and click Next. You will be taken to the settings page which you can read about on the next step.
Duplicating an existing campaign instead
Alternatively you can duplicate an existing page you have previously created. To do this, go to your list of campaigns (by clicking on Page Builder in the menu) and next to the one you wish to duplicate, click the copy button under the “Dup” column. It will ask you for a new name (the box may further down the screen so you might need to scroll). Enter this and click Duplicate.
Click the cog icon in the toolbar and go to the next step.
Select your targets
The first step is to decide on the target, or targets, of your campaign.
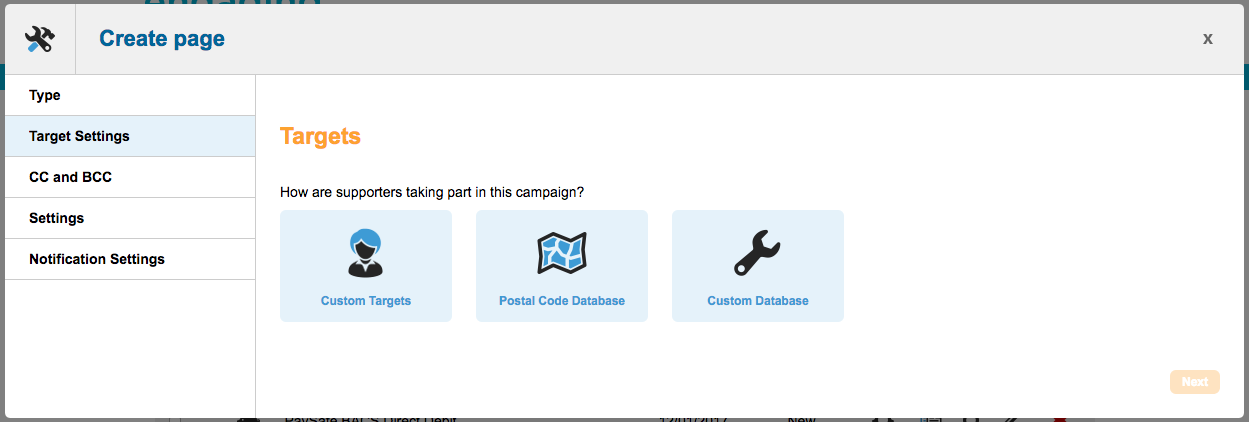
You have three options:
Custom targets
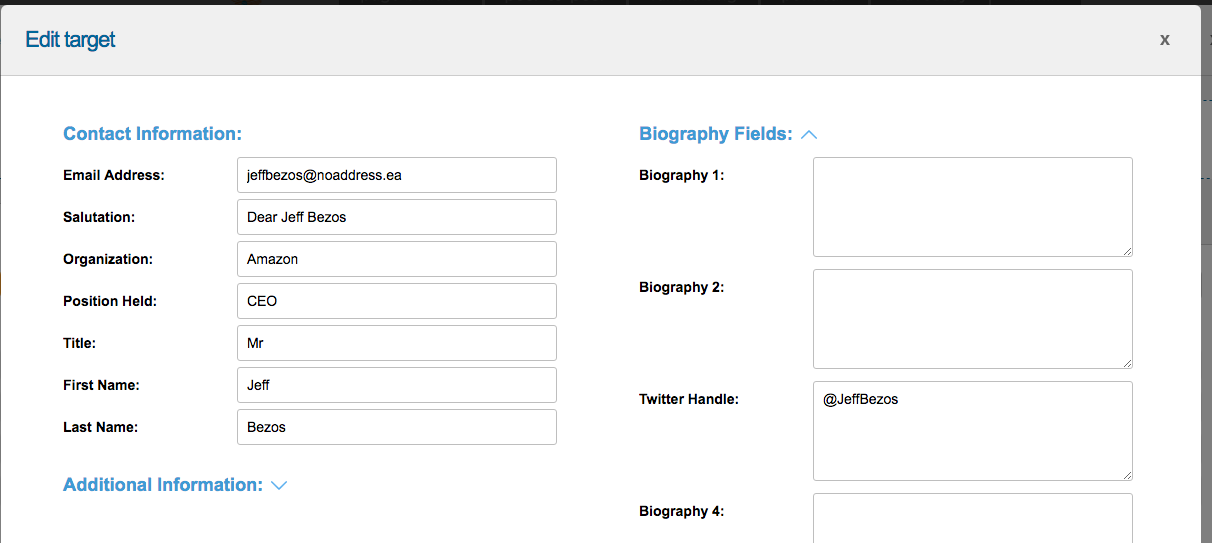
This option allows you add your own targets for your action. You can choose from targets you have added previously, or create new ones. You can also select several contacts to make a group.
For a target to be posted at, they need to have a handle (starting with @) set under X Handle (previously called Twitter Handle) which is found under Biography Fields.
All the contact information is required but if you do not know the email address, you can put a dummy one in (e.g. ending in @noaddress.ea) since it won’t necessarily be used.
Under Additional information, you can optionally add a URL to an image under Party image. This will replace the standard X icon that displays in the target block.
Postal Code Database
This option allows you to use one of our post code databases, such as Senators or MPs, which will select target(s) according to where the supporter lives. You can use up to two postal code databases on one page. Only databases that are provided with X handles are listed here. Check the list of databases to find out which ones are available.
Custom Databases
This allows you to upload your own database for use on your campaign. Targets are selected according to a matched field within the database. For example on Page 1 you could ask who their electricity supplier is, and then on Page 2 it would look at your custom database for the supplier and return the X handle.
Update the page settings
You can also access this screen later on from within page builder by clicking the cog icon. This screen is just like other page’s admin screens.
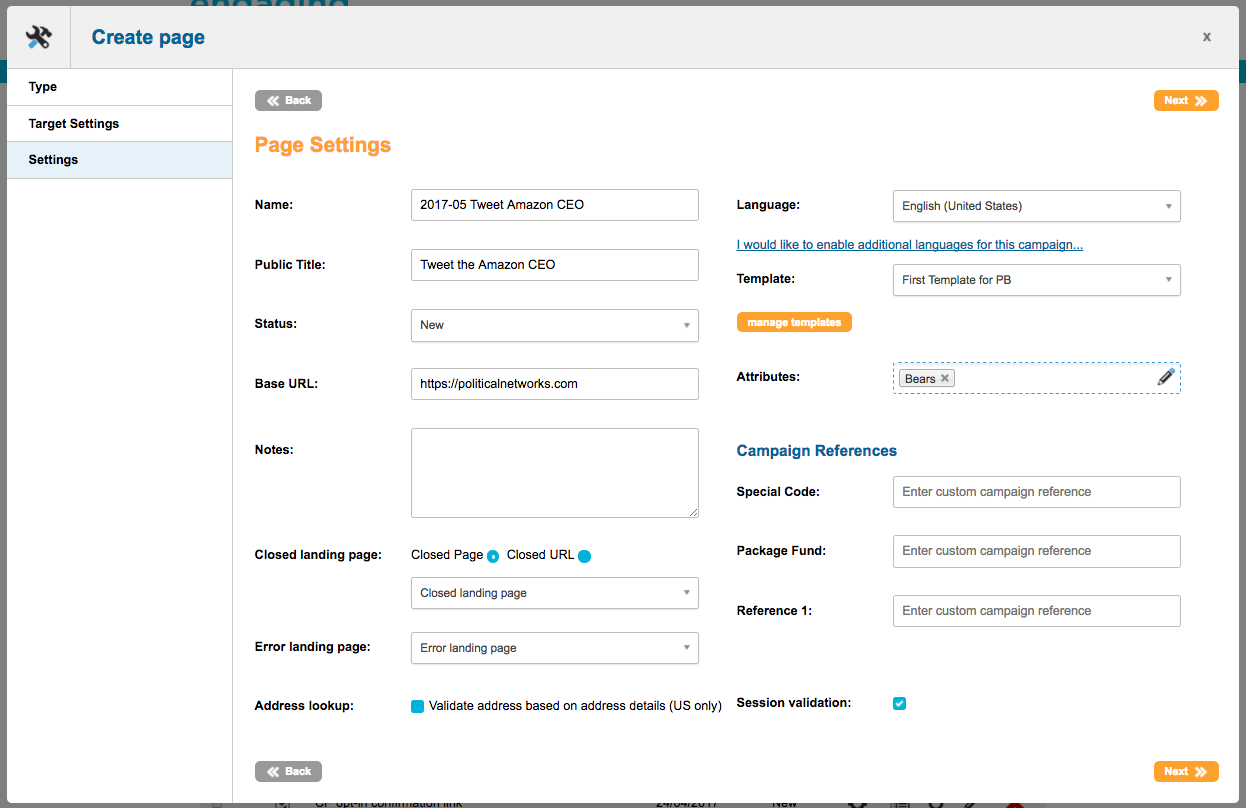
The following fields can be completed:
Name: This is the reference name of your page for your own purposes (the supporter won’t see this). It is a good idea to come up with a naming convention so you can keep track of your campaigns, which is especially useful when using the query builder. For example, “2017-01 Ocean MP action”
Public title: This field is the public name of your page. You can reveal this by using page tags.
Status: By default, pages are “New” until you are ready to launch them. New means that the live URL is not available until you set the status to “Live”. You can also close pages here.
Base URL: The Base URL is the first part of the address of your page (the domain). Unless you have changed the default Base URL in your account preferences, this will be engagingnetworks.app. For more about the Base URL, click here.
Notes: Any notes you want to add, type in here. This is for internal use and isn’t visible to supporters.
Closed landing page and Error landing page: read more here.
Address lookup: US Only – this allows you to validate addresses using postal code mapping.
Language: You can optionally add the ability to have different locales for your page, so that text blocks, forms and so on show different versions depending on the browser language.
Template: The template determines how your page looks – the header and footer, as well as fonts, colours and so on. For more about templates, click here.
Attributes: You can optionally catergorise your page according to Attributes.
Once you click next, you can optionally set notification settings which will can send you an email when a supporter completes the page. Click Save and the admin screen will close, showing you the Page Builder itself.
Add the content of your page
Once you have completed your page’s settings, you will be taken to the page editor which allows you to add content such as text and form fields to your campaign.
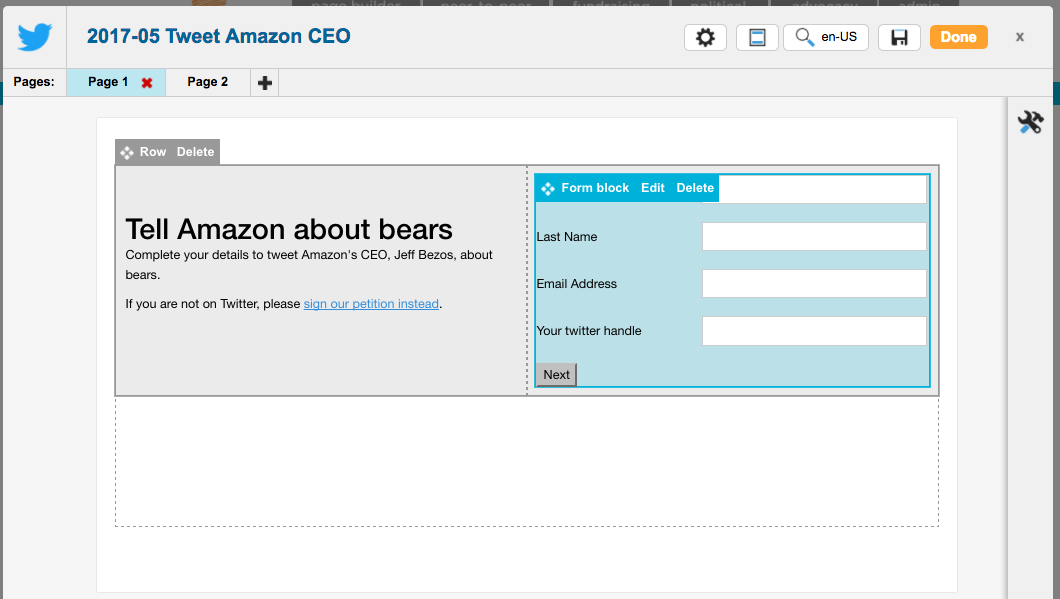
This editor is “WYSIWYG”, and shows how your page will look once it is live, allowing you edit the page by dragging in components, and hovering over them to edit them or move them around.
X Post to target block
As opposed to other pages types you need to add a X target block to your action. This displays the contact or contacts that you want your supporters to post at. It also displays buttons to allow them to post. This is usually added to Page 2.
When you add a X to post target block you will see a new screen. The post Content is where you create your suggested post text. {twitter_handle} (this did not change after Twitter was changed to X) will insert the @handle of the contact (the target, e.g. the MP). You can insert user fields (i.e. your supporter’s fields) such as Town or first name, but be aware of how this might effect the post length.
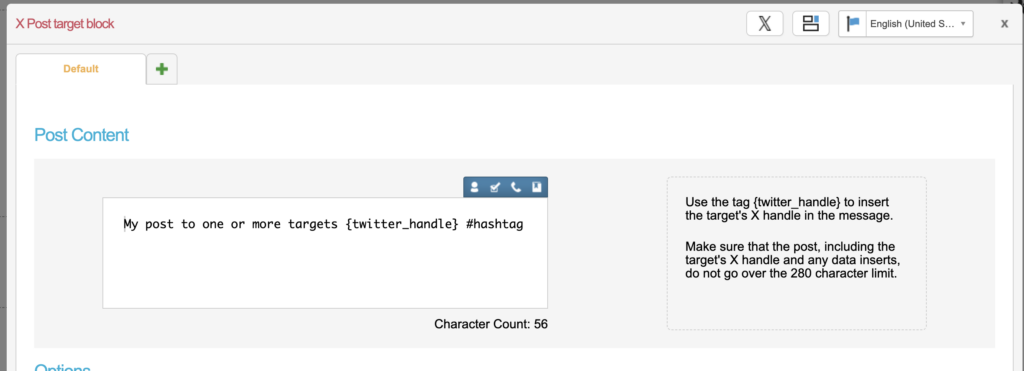
There are also options below the post content where you can decide on how the system deals with contacts returned that have no X handles.
Pages
You can have several pages, allowing the supporter to step through the campaign step-by-step. You will need to put the X target block on Page 2 after they have entered their email address and post code on Page 1 if you want the system to display the targets. You can navigate between pages using the “Page 1, Page 2” buttons at the top. A common set-up for X to post target pages is:
Page 1
Two-column row
Left column – a Text block explaining what the campaign is about. Note: You may wish to offer an alternative action for those who do not use X
Right column – a form for the supporter to add their email address and any other details you want to collect, including an opt-in question and submit button. The email address must be present. You should also include a post code field for post code-enabled databases (such as Congress or MPs). US post code databases also require Address 1, City, and State. Any other ones are optional and up to you. If you wish to record the supporter’s X handle, then you can, but you may need to add this to your Account Data Structure if it isn’t already there.
Page 2
One-column row
A X post to target block that displays the target name and handle and editable post
Additional pages
Unlike email-to-target actions, when the supporter takes action (i.e. posts) it does not submit the page (so the supporter will not move to the next page). This is because they may wish to post to several people and it has to be done one at a time. Therefore you may wish to include a submit button (inside a form block) for supporters to click when they have completed their posts to see a thank you page of to give them the chance to take further actions.
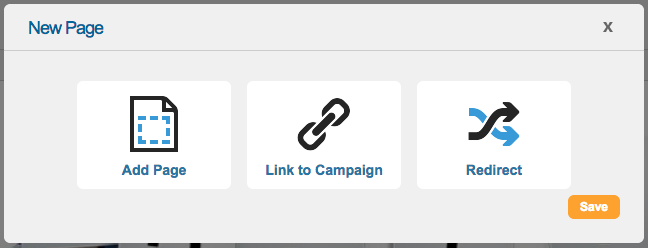
You can add a standard page (e.g. thanks page), or you could link to another campaign (pre-populating any fields) or redirect to your website:
If you add a thank you email, then this will not be sent unless you have a page after the one containing the X to post target block. The email is not sent after the supporter clicks the Post button, it is only sent should they submit the page.
Test and launch your campaign!
Test your pages
Click the orange “Done” button to validate the page once you have saved the page and are ready to test it. This button reports on any missing elements, and reminds you about other things you may want to think about.
You can then view the page as if it were live by clicking the magnifying glass (Preview button). The page is shown in a new tab in “DEMO” mode (which you can confirm by viewing the URL – it will end with “?mode=DEMO”).
We cannot “fake” post at a target like we do with emailing targets . When you click the post button a real X window will be displayed, so do not go on to send a post unless you wish to post for real.
If you have created versions for different locales or profiles, you will be able to view them via the preview button.
Make it live
Once you are happy it is working correctly, you can change the status from New to Live. To do this, click the cog icon to access the page Settings and change Status from New to Live, then click Save.
In the Page Builder list of pages, you can then click on the name of your page to view the live URL.
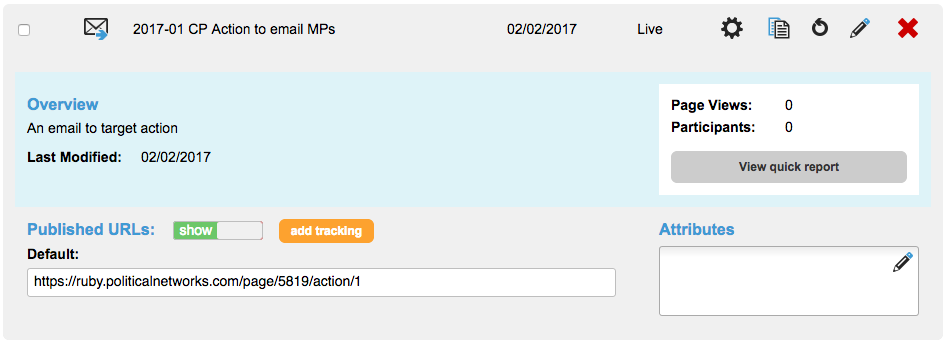
Under “Published URLs” you can see the URL of your page. Click “Add tracking” to add different versions of this URL for use on other channels, such as your website, in emails, or on Facebook. Then you can easily see how people come to see your page.
Once it has been running for a while, you can click “View quick report” to see how your action is doing.
Things to consider when creating a X to post to Target page:
When your supporters click the post button on the page, a transaction (of type TWT) will be created (for each post button they click) regardless of whether they go on to post from the pop-up that appears. It is not possible to know this automatically as that information is not supplied, but you could search X for your hashtag or other searchable text to find out your conversion rate.
If you place the X post target block on Page 1 for a custom target, the system will not be able to register a transaction because it does not yet know who the supporter is (unless coming from an email or a redirect)
If you choose to send one post to a group of contacts, the handles will be concatenated in the post like this: @handle1 @handle2 @handle3
Just like Email to target actions, you can use message rotation and rules by adding new messages in the X to post target block If you’re targeting a US database, be sure to enable ‘Address look up’ in the page admin settings.
