Ecard step-by-step
Ecard pages allow your supporters to send email cards to their friends and family, for example for Mother’s Day or as a way to ask them to support a campaign.
When a supporter sends an ecard, they will receive a confirmation message (which you set up in the ecard block). When they confirm by clicking the link they will see a landing page.
Ecard confirmation links that are sent to a supporter expire after one hour. Ecard confirmation links are not sent when the Ecard is following a chained re-direct following a successful donation.
Before you start
Before setting up an Ecard, you need to:
set up an e-card sender. We recommend sending the cards from your organization to improve deliverability
Create your Ecard page
To create a new page, you can either duplicate or create a new one from scratch.
To create a brand new page, click “New Page”. You will be shown a variety of different pages you can make:
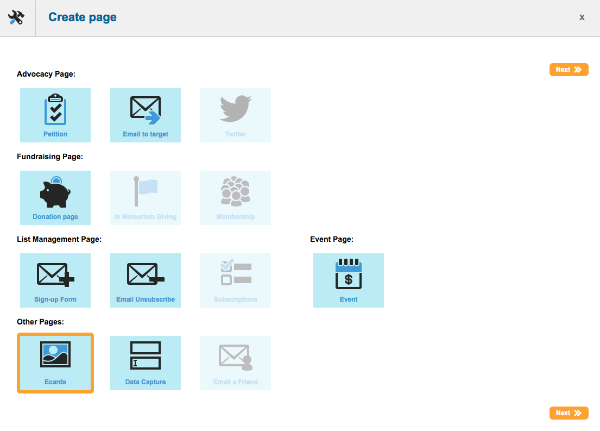
Click on “e-card” and click Next. You will be taken to the settings page which you can read about on the next step.
Duplicating an existing campaign
Alternatively you can duplicate an existing page you have previously created. To do this, go to your list of campaigns (by clicking on page-builder in the menu) and next to the one you wish to duplicate, click the copy button under the “Dup” column. It will ask you for a new name (the box may further down the screen so you might need to scroll). Enter this and click Duplicate.
Click the cog icon in the toolbar and go to the next step.
Update the page settings
You can also access this screen from within page builder via the cog icon.
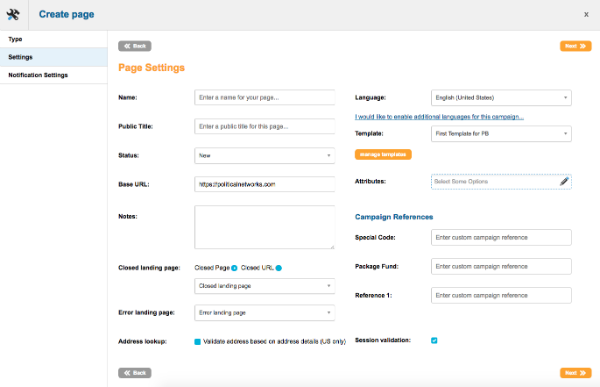
The following fields can be completed:
Name: This is the reference name of your page for your own purposes (the supporter won’t see this). It is a good idea to come up with a naming convention so you can keep track of your campaigns, which is especially useful when using the query builder. For example, “2017-01 Birthday e-card”
Page Title: A “friendly” title that can be referenced in the API or inserted into your HTML template.
Status: By default, pages are “New” until you are ready to launch them. New means that the live URL is not available until you set the status to “Live”. You can also close pages here.
Base URL: The Base URL is the first part of the address of your page. By default this is engagingnetworks.app, but you can read more here about where to set your default base URLs, and here for more about changing the Base URL to something more familiar to your supporters.
Notes: Any notes you want to add, type in here. This is for internal use and isn’t visible to supporters.
Closed landing page and Error landing page: read more here.
Address lookup: US Only – this allows you to validate addresses using postal code mapping.
Language: You can optionally add the ability to have different locales for your page, so that text blocks, forms and so on show different versions depending on the browser language.
Template: The template determines how your page looks – the header and footer, as well as fonts, colours and so on. For more about templates, click here.
Attributes: You can optionally catergorise your page according to Attributes.
Once you click next, you can optionally set notification settings which will can send you an email when a supporter completes the page. Click Save and the admin screen will close, showing you the Page Builder itself.
Add the content of your page
Once you have completed your page’s settings, you will be taken to the page editor which allows you to add content such as text and the Ecard to your campaign.
This editor is “WYSIWYG”, and shows how your page will look once it is live, allowing you edit the page by dragging in components, and hovering over them to edit them or move them around.
Pages
Note that you are on “Page 1” initially. You can have several pages, allowing the supporter to step through the campaign step-by-step. A common set-up for e-card pages is:
Page 1
One-column row
A block of e-card to choose from
A personal message field to include in the card
A recipient block to enter the recipient details
Page 2
One-column row
A text block thanking the supporter for sending the card
One-column row
Text block saying thanks to the supporter
Social share buttons
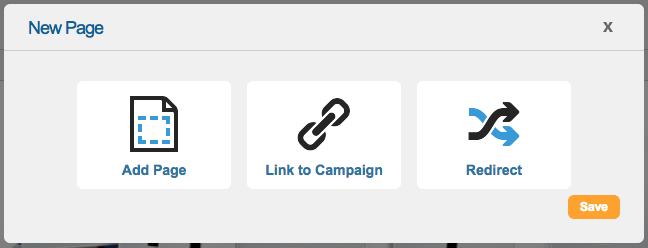
Rather than a standard page for Page 2, you could add a link to another campaign or a redirection to your website:
Rows
Rows hold the content of your page, and can be one or two column. You can only drag components into “rows”, shown as a white box with a dotted border in the screenshot above. For more about rows, click here.
The toolbar
By hovering over the toolbar icon on the right you have access to the types of content you can add. For more about the toolbar, click here.
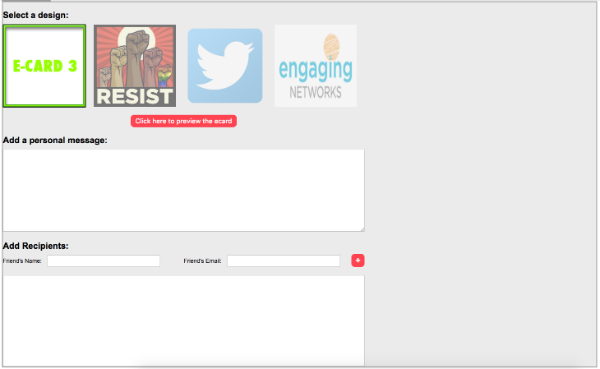
Ecard block
Ecard pages are unique in that they have an “Ecard block”. These consist of a display of available email designs, a space for their personal message, and allows the supporter to add their friends’ email addresses for delivery. You also set up the confirmation message here.
For more information on setting up the Ecard block, click here.
Other components
To add a design element to your page layout, click on the name of the tool to show which items are available. Once you have identified the item you’d like to add to your page, click and drag it into the layout. A common component is the “text block“, for example, which allows you to add formatted text to your page, and a “form block” that allows you to add form fields and questions, such as email address or an opt-in checkbox, as well as the submit button.
Save, save, save…
Remember to continually Save your page as you add components and edit them. You can lose your amendments if you close your browser tab or the editor itself.
Test and launch your campaign!
Test your pages
Click the orange “Done” button![]() to validate the page once you have saved the page and are ready to test it. This button reports on any missing elements and reminds you about other things you may want to think about.
to validate the page once you have saved the page and are ready to test it. This button reports on any missing elements and reminds you about other things you may want to think about.
You can then view the page as if it were live by clicking the magnifying glass (Preview button). The page is shown in a new tab in “DEMO” mode (which you can confirm by viewing the URL – it will end with “?mode=DEMO”). You can submit the form and send out e-cards to yourself. In this way, you can confirm that the action is working exactly how you want it to.
Make it live
Once you are happy it is working correctly, you can change the status from New to Live. To do this, click the cog icon and change Status from New to Live, then click Save.
In the Page Builder list of pages, you can then click on the name of your page to view the live URL.
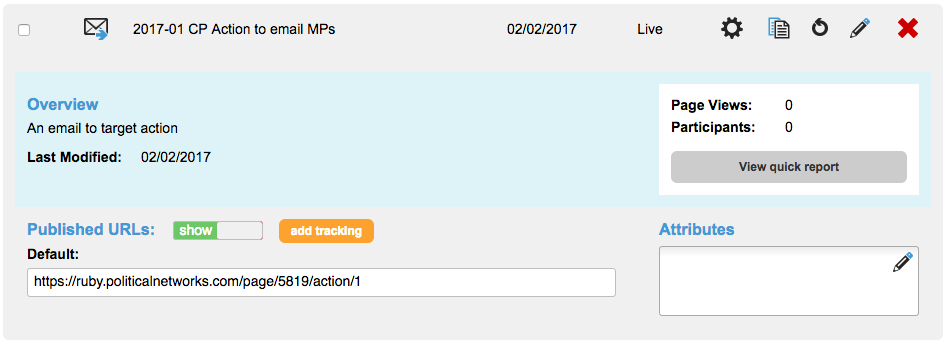
Under “Published URLs” you can see the URL of your page. Click “Add tracking” to add different versions of this URL for use on other channels, such as your website, in emails, or on Facebook. Then you can easily see how people come to see your page.
Once it has been running for a while, you can click “View quick report” to see how your action is doing, or look at the visual reporting for more details.